Dataclasses & Pydantic Models#
Dataclasses and Pydantic models can easily be registered with their GUI.
Dataclasses#
Example: automatically create a GUI for a “Person” dataclass#
To create a GUI for a dataclass, you first need to register the dataclass with its GUI.
For this, you can use fl.register_dataclass(dataclass_type, **fiat_attributes) or the @fl.dataclass_with_gui_registration(**fiat_attributes) decorator.
In either case, you can specify GUI options for the fields using the fiat_attributes mechanism.
Option 1: using register_dataclass:
import fiatlight as fl
from dataclasses import dataclass

class Person:
    name: str
    age: int

fl.register_dataclass(Person, age__range=(0, 120))
Option 2: using the decorator dataclass_with_gui_registration:
import fiatlight as fl
from dataclasses import dataclass

@fl.dataclass_with_gui_registration(age__range=(0, 120))
class Person:
    name: str
    age: int
(This option is shorter, but more intrusive, as it modifies the original class definition.)
Use the generated GUI in Fiatlight#
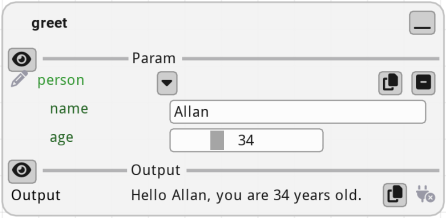
You can use the dataclass as a function parameter, and fiatlight will generate a GUI for it.
def greet(person: Person) -> str:
    return f"Hello {person.name}, you are {person.age} years old."

# Note: this app *will not* remember the values of the dataclass fields between runs
fl.run(greet, app_name="Dataclass Person")
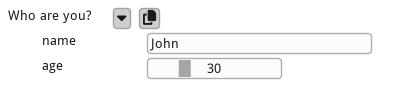
Or use the generate GUI in standalone application#
Alternatively, you can use the generated GUI in a standalone application. Below we run an application using hello_imgui. For more info, see Dear ImGui Bundle doc.
from imgui_bundle import hello_imgui

PERSON = Person(name="John", age=30)

def gui():
    global PERSON
    _changed, PERSON = fl.immediate_edit("Who are you?", PERSON)

hello_imgui.run(gui)
Pydantic models#
Below is a more complete example of how to use Pydantic models with fiatlight.
Example: automatically create a GUI for nested Pydantic models#
Notes:
fiatlight will automatically generate a serialization/deserialization mechanism for Pydantic models, so that user entries can be saved and reloaded (when used as function parameters). This is not available for dataclasses.
Pydantic models can be nested: in the example below, you will see 3 levels of nesting, and fiatlight will generate a nice GUI for those.
You can use
fl.register_base_modelto register a Pydantic model with its GUI and add fiat attributes Alternatively, you can use the@fl.base_model_with_gui_registrationdecorator (but this is more intrusive, as it modifies the original class definition).You can specify GUI options for the fields using the fiat_attributes mechanism.
Pydantic field validators (such as
Field(ge=0, le=90, ...)) are supported and will be reflected in the GUI.Custom validators can be used, as shown in the example below.
Validation errors will be displayed in the GUI (in yellow)
import fiatlight as fl
from enum import Enum
from pydantic import BaseModel, Field


# An Enum which will be associated to a Gui automatically
class TrainingDataType(Enum):
    Test = "test"
    Train = "train"
    Validation = "validation"


# GeographicInfo: a pydantic model, with validation on latitude and longitude
# which will be reflected in the GUI
class GeographicInfo(BaseModel):
    latitude: float = Field(ge=0, le=90, default=0)
    longitude: float = Field(ge=-180, lt=180, default=0)

# We register the GeographicInfo model with its GUI
# (the sliders for lon/lat will be limited to the ranges specified in the Fields)
fl.register_base_model(GeographicInfo)


# A custom validator, which will be used to validate the short description
def validate_short_description(value: str) -> str:
    if len(value) > 30:
        raise ValueError("Description is too long")
    return value


# A second model, which nests the first one (GeographicInfo)
class ImageInfo(BaseModel):
    geo_info: GeographicInfo = GeographicInfo()
    description: str = "Short Description..."
    width: int = 0
    height: int = 0

# We register the ImageInfo model with its GUI, and add some fiat attributes
# Also, we add a custom Fiatlight validator for the description field
fl.register_base_model(
    ImageInfo,
    width__range=(0, 2000),
    height__range=(0, 2000),
    description__label="Description",
    description__validator=validate_short_description,
    geo_info__label="Geographic Info",
)


# A third model, which nests the second one (ImageInfo)
# In total, it has 3 levels: TrainingImage -> ImageInfo -> GeographicInfo
# In this case, we use the decorator to register the model with its GUI
@fl.base_model_with_gui_registration(
    image_path__label="Select Image",
    training_type__label="Training Set",
    info__label="Image Info",
)
class TrainingImage(BaseModel):
    image_path: fl.fiat_types.ImagePath = ""  # type: ignore
    training_type: TrainingDataType = TrainingDataType.Test
    info: ImageInfo = ImageInfo(width=0, height=0)
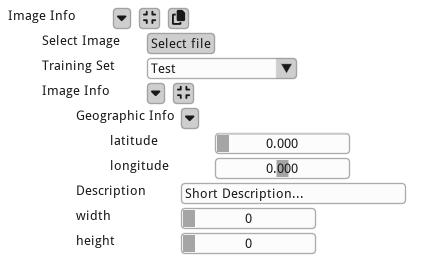
Use the generated GUI in a standalone application#
from imgui_bundle import hello_imgui

# We create an instance of the Pydantic model
IMAGE = TrainingImage()

def gui():
    global IMAGE
    _changed, IMAGE = fl.immediate_edit("Image Info", IMAGE)

hello_imgui.run(gui)
Or use the generated GUI in Fiatlight#
def process_image(image: TrainingImage) -> str:
    import os
    basename = os.path.basename(image.image_path)
    return basename

# Note: this app *will* remember the values of the Pydantic model fields between runs
fl.run(process_image, app_name="Pydantic Image Model")
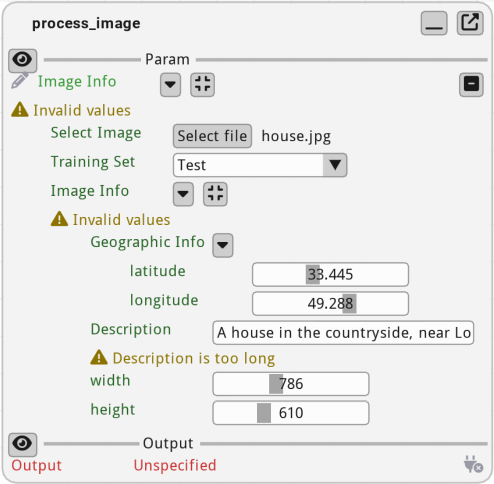
In the previous screenshot, the GUI generated by fl.base_model_with_gui_registration
will automatically validate the data according to the model’s constraints, and thus display an error message (because in this case, the description is too long).
Video Tutorial#
A short video tutorial is available for this topic.