Assets
HelloImGui and ImmApp applications rely on the presence of an assets folder.
This folder stores
-
All the resources (images, fonts, etc.) used by the application. Feel free to add any resources there!
-
The application settings (e.g. the app icon, the app settings for macOS and iOS, etc.)
Assets folder location
-
Python: Place the assets folder in the same folder as the script
-
C++: The assets folder should be placed in the same folder as the CMakeLists.txt for the application (the one calling
imgui_bundle_add_app)
Typical layout of the assets folder
assets/
    +-- app_settings/                # Application settings
    |    +-- icon.png                # This will be the app icon, it should be square
    |    |                           # and at least 256x256. It will  be converted
    |    |                           # to the right format, for each platform (except Android)
    |    +-- apple/
    |    |         +-- Info.plist    # macOS and iOS app settings
    |    |                           # (or Info.ios.plist + Info.macos.plist)
    |    |
    |    +-- android/                # Android app settings: files here will be deployed
    |    |   |-- AndroidManifest.xml # Optional manifest
    |    |   +-- res/
    |    |       +-- mipmap-xxxhdpi/ # Optional icons for different resolutions
    |    |           +-- ...         # Use Android Studio to generate them:
    |    |                           # right click on res/ => New > Image Asset
    |    +-- emscripten/
    |      |-- shell.emscripten.html # Emscripten shell file
    |      |                         #   (this file will be cmake "configured"
    |      |                         #    to add the name and favicon)
    |      +-- custom.js             # Any custom file here will be deployed
    |                                #   in the emscripten build folder

    +-- fonts/
    |    +-- DroidSans.ttf            # Default fonts used by HelloImGui to
    |    +-- fontawesome-webfont.ttf  # improve text rendering (esp. on High DPI)
    |    |                            # if absent, a default LowRes font is used.
    |    |
    |    +-- Roboto/                  # Optional: fonts for markdown
    |         +-- LICENSE.txt
    |         +-- Roboto-Bold.ttf
    |         +-- Roboto-BoldItalic.ttf
    |         +-- Roboto-Regular.ttf
    |         +-- Roboto-RegularItalic.ttf
    |         +-- Inconsolata-Medium.ttf
    +-- images/
         +-- markdown_broken_image.png  # Optional: used for markdown
         +-- world.png                  # Add anything in the assets folder!
If needed, change the assets folder location:
-
Python: Call
hello_imgui.set_assets_folder()at startup. -
C++: Call
HelloImGui::SetAssetsFolderat startup. Or specify its location in CMake viaimgui_bundle_add_app(app_name file.cpp ASSETS_LOCATION "path/to/assets").
Where to find the default assets
Look at the folder imgui_bundle/bindings/imgui_bundle/assets to see their content.
Demo using assets & add-ons
This demonstration showcases how to:
-
Load and use assets (fonts, images, icons, etc.)
-
Use ImPlot to display various types of plots
-
Use markdown to display formatted messages
This demonstration source code is heavily documented and should be self-explanatory.
Click to see its source code in C++
#include "hello_imgui/hello_imgui.h"
#include "hello_imgui/icons_font_awesome_4.h"
#include "immapp/immapp.h"
#include "imgui_md_wrapper/imgui_md_wrapper.h"
#ifdef IMGUI_BUNDLE_WITH_IMPLOT
#include "implot/implot.h"
#endif
#include "immapp/code_utils.h"
#include "demo_utils/api_demos.h"
#include <vector>
#include <map>
// This function displays the help messages that are displayed in this demo application
void ShowDoc(const std::string& whichDoc);
// Your global application state, that will be edited during the execution
struct AppState
{
// you can edit the ImPlot pie chart values
std::vector<float> PlotData = {0.15f, 0.30f, 0.2f, 0.05f};
// You can edit a demo markdown string
char MarkdownInput[4000] = "*Welcome to the interactive markdown demo!* Try writing some markdown content here.";
//
// Note about AppState:
// Inside ImGui demo code, you will often see static variables, such as in this example
// ```cpp
// static int value = 10;
// bool changed = ImGui::SliderInt("Value", &value, 0, 10); // edit this variable between 0 and 10
// ```
// In this example, `value` is a static variable whose state is preserved:
// it merely acts as a global variable, whose scope is limited to this function.
// Global variables should be avoided, and storing the Application State like this is preferable in production code.
//
};
// A demo showcasing the assets usage in HelloImGui and ImmApp
void DemoAssets(AppState& appState)
{
ImGuiMd::Render("# Demo Assets");
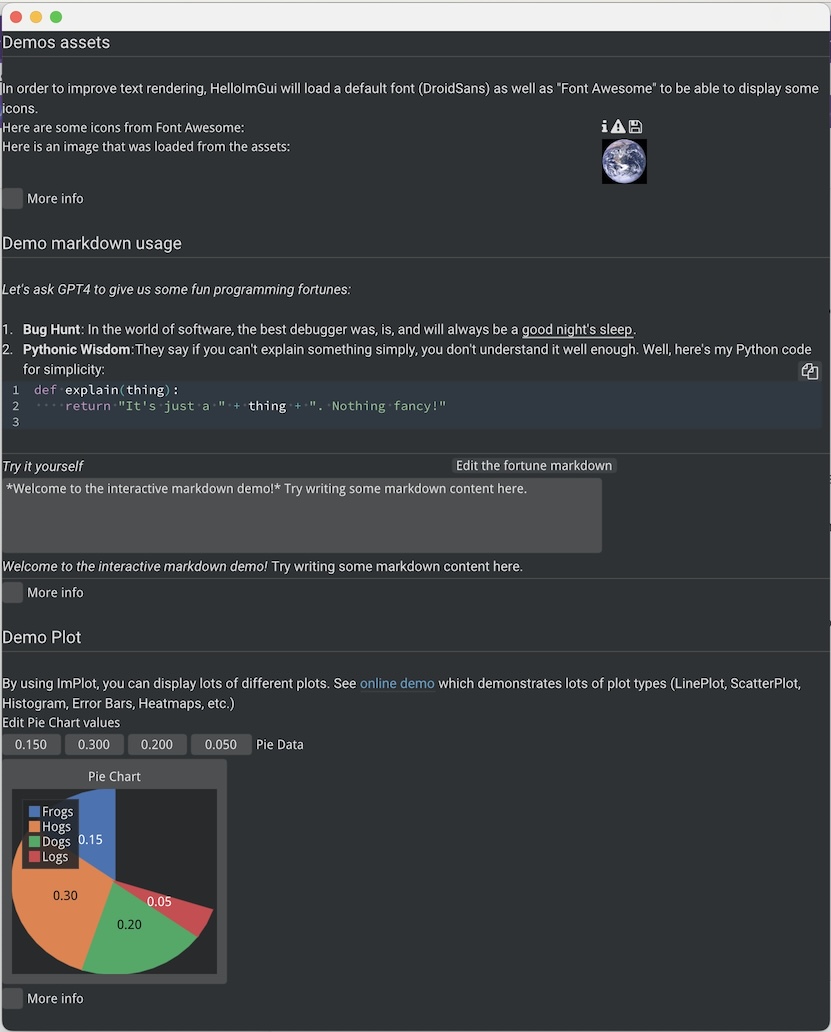
ImGui::Text("Here are some icons from Font Awesome: ");
ImGui::SameLine(); ImGui::SetCursorPosX(HelloImGui::EmSize(40.f));
ImGui::Text(ICON_FA_INFO " " ICON_FA_EXCLAMATION_TRIANGLE " " ICON_FA_SAVE);
ImGui::Text("Here is an image that was loaded from the assets: ");
ImGui::SameLine(); ImGui::SetCursorPosX(HelloImGui::EmSize(40.f));
// Prefer to specify sizes using the "em" unit: see https://en.wikipedia.org/wiki/Em_(typography)
// Below, imageSize is equivalent to the size of 3 lines of text
ImVec2 imageSize = HelloImGui::EmToVec2(3.f, 3.f);
HelloImGui::ImageFromAsset("images/world.png", imageSize);
ImGuiMd::Render("**Read the [documentation about assets](https://pthom.github.io/imgui_bundle/quickstart.html#quickstart_about_assets)**");
ShowDoc("AssetsDoc");
}
// A demo about the usage of the markdown renderer
void DemoMarkdown(AppState& appState)
{
std::string markdownDemo = R"(
# Demo markdown usage
Let's ask GPT4 to give us some fun programming fortunes in markdown format:
1. **Bug Hunt**: In the world of software, the best debugger was, is, and will always be a _good night's sleep_.
2. **Pythonic Wisdom**:
> They say if you can't explain something simply, you don't understand it well enough. Well, here's my Python code for simplicity:
```python
def explain(thing):
return "It's just a " + thing + ". Nothing fancy!"
```
)";
ImGuiMd::RenderUnindented(markdownDemo);
// Interactive demo
ImGui::Separator();
ImGuiMd::Render("*Try it yourself*");
ImGui::SameLine(HelloImGui::EmSize(30.f));
if (ImGui::SmallButton("Edit the fortune markdown"))
strcpy(appState.MarkdownInput, CodeUtils::UnindentMarkdown(markdownDemo).c_str());
ImGui::InputTextMultiline("##Markdown Input", appState.MarkdownInput, sizeof(appState.MarkdownInput), HelloImGui::EmToVec2(40.f, 5.f));
ImGuiMd::RenderUnindented(appState.MarkdownInput);
ImGui::Separator();
ShowDoc("MarkdownDoc");
}
#ifdef IMGUI_BUNDLE_WITH_IMPLOT
// A demo showcasing the usage of ImPlot
void DemoPlot(AppState& appState)
{
ImGuiMd::Render("# Demo ImPlot");
static const char* data_labels[] = {"Frogs", "Hogs", "Dogs", "Logs"};
ImGui::Text("Edit Pie Chart values");
ImGui::SetNextItemWidth(250);
ImGui::DragFloat4("Pie Data", appState.PlotData.data(), 0.01f, 0, 1);
// Prefer to specify sizes using the "em" unit: see https://en.wikipedia.org/wiki/Em_(typography)
// Below, plotSize is equivalent to the size of 1 lines of text
ImVec2 plotSize = ImmApp::EmToVec2(15.f, 15.f);
if (ImPlot::BeginPlot("Pie Chart", plotSize))
{
ImPlot::SetupAxes("", "", ImPlotAxisFlags_NoDecorations, ImPlotAxisFlags_NoDecorations);
ImPlot::PlotPieChart(
data_labels,
appState.PlotData.data(), appState.PlotData.size(), // data and count
0.5, 0.5, // pie center position in the plot(x, y). Here, it is centered
0.35, // pie radius relative to plotSize
"%.2f", // fmt
90 // angle
);
ImPlot::EndPlot();
}
ShowDoc("PlotDoc");
}
#else
void DemoPlot(AppState& appState) {}
#endif
// Our main function
int main(int, char**)
{
// This call is specific to the ImGui Bundle interactive manual. In a standard application, you could write:
// HelloImGui::SetAssetsFolder("my_assets"); // (By default, HelloImGui will search inside "assets")
ChdirBesideAssetsFolder();
AppState appState; // Our global appState
// This is our GUI function:
// it will display the widgets
// it captures the appState, since it can modify it
auto gui = [&appState]()
{
DemoAssets(appState);
ImGui::NewLine();
DemoMarkdown(appState);
ImGui::NewLine();
DemoPlot(appState);
};
// Then, we start our application:
// First, we set some RunnerParams, with simple settings
HelloImGui::SimpleRunnerParams runnerParams;
runnerParams.windowSize = {1000, 1000};
// Here we set our GUI function
runnerParams.guiFunction = gui;
// Then, we need to activate two addons: ImPlot and Markdown
ImmApp::AddOnsParams addons;
addons.withImplot = true;
addons.withMarkdown = true;
// And we are ready to go!
ImmApp::Run(runnerParams, addons);
return 0;
}
///////////////////////////////////////////////////////////////////////////////
// End of demo code
///////////////////////////////////////////////////////////////////////////////
//
// Note: the code below only displays the help messages
//
std::string GetDoc(const std::string& whichDoc)
{
static std::map<std::string, std::string> docs =
{
{
"AssetsDoc",
R"(
The icons and image were shown via this code:
C++
```cpp
ImGui::Text(ICON_FA_INFO " " ICON_FA_EXCLAMATION_TRIANGLE " " ICON_FA_SAVE);
ImVec2 imageSize = HelloImGui::EmToVec2(3.f, 3.f);
HelloImGui::ImageFromAsset("images/world.png", imageSize);
```
Python
```python
imgui.text(icons_fontawesome.ICON_FA_INFO + " " + icons_fontawesome.ICON_FA_EXCLAMATION_TRIANGLE + " " + icons_fontawesome.ICON_FA_SAVE)
image_size = hello_imgui.em_to_vec2(3.0, 3.0)
hello_imgui.image_from_asset("images/world.png", image_size)
```
*Note: In this code, imageSize is equivalent to the size of 3 lines of text, using the [em unit](https://en.wikipedia.org/wiki/Em_(typography))*
)"
},
{
"MarkdownDoc",
R"(
This markdown string was rendered by calling either:
C++
```cpp
ImGuiMd::Render(markdown_string); // render a markdown string
ImGuiMd::RenderUnindented(markdown_string); // remove top-most indentation before rendering
```
Python
```python
imgui_md.render(markdown_string); # render a markdown string
imgui_md.render_unindented(markdown_string); # remove top-most indentation before rendering
```
This markdown renderer is based on [imgui_md](https://github.com/mekhontsev/imgui_md), by Dmitry Mekhontsev.
It supports the most common markdown features: emphasis, link, code blocks, etc.
)"
},
{
"PlotDoc",
R"(
By using ImPlot, you can display lots of different plots. See [online demo](https://traineq.org/implot_demo/src/implot_demo.html) which demonstrates lots of plot types (LinePlot, ScatterPlot, Histogram, Error Bars, Heatmaps, etc.)
Note: in order to use ImPlot, you need to "activate" this add-on, like this:
C++
```cpp
ImmApp::AddOnsParams addons { .withImplot = true };
ImmApp::Run(runnerParams, addons);
```
Python:
```python
addons = immapp.AddOnsParams(with_implot=True)
immapp.run(runner_params, addons);
```
)"
},
};
return docs.at(whichDoc);
}
void ShowDoc(const std::string& whichDoc)
{
static std::map<std::string, bool> is_doc_visible;
if (is_doc_visible.find(whichDoc) == is_doc_visible.end())
is_doc_visible[whichDoc] = false;
ImGui::PushID(whichDoc.c_str());
ImGui::Checkbox("More info", &is_doc_visible[whichDoc]);
if (is_doc_visible[whichDoc])
{
ImGuiMd::RenderUnindented(GetDoc(whichDoc));
ImGui::Dummy(HelloImGui::EmToVec2(1.f, 6.f));
ImGui::Separator();
}
ImGui::PopID();
}Click to see its source code in Python
from imgui_bundle import imgui, implot, immapp, hello_imgui, imgui_md, icons_fontawesome
from imgui_bundle.demos_python import demo_utils

import numpy as np
from typing import Dict, List
from dataclasses import dataclass, field


def show_doc(which_doc: str):
    """This function displays the help messages that are displayed in this demo application
    (implemented later in this file)"""
    ...


@dataclass
class AppState:
    """Your global application state, that will be edited during the execution."""

    # you can edit the ImPlot pie chart values
    plot_data: List[float] = field(default_factory=lambda: [0.15, 0.30, 0.2, 0.05])

    # You can edit a demo markdown string
    markdown_input: str = "*Welcome to the interactive markdown demo!* Try writing some markdown content here."

    #
    # Note about AppState:
    # Inside ImGui demo code, you will often see static variables, such as in this example
    #     static int value = 10;
    #     bool changed = ImGui::SliderInt("Value", &value, 0, 10);  // edit this variable between 0 and 10
    # In this example, `value` is a static variable whose state is preserved:
    # it merely acts as a global variable, whose scope is limited to this function.
    # Global variables should be avoided, and storing the Application State like this is preferable in production code.


def demo_assets(app_state: AppState):
    """A demo showcasing the assets usage in HelloImGui and ImmApp"""
    imgui_md.render("# Demo Assets")

    imgui.text("Here are some icons from Font Awesome: ")
    imgui.same_line()
    imgui.set_cursor_pos_x(hello_imgui.em_size(40.0))
    imgui.text(
        icons_fontawesome.ICON_FA_INFO
        + " "
        + icons_fontawesome.ICON_FA_EXCLAMATION_TRIANGLE
        + " "
        + icons_fontawesome.ICON_FA_SAVE
    )

    imgui.text("Here is an image that was loaded from the assets: ")
    imgui.same_line()
    imgui.set_cursor_pos_x(hello_imgui.em_size(40.0))

    # Prefer to specify sizes using the "em" unit: see https://en.wikipedia.org/wiki/Em_(typography)
    # Below, image_size is equivalent to the size of 3 lines of text
    image_size = hello_imgui.em_to_vec2(3.0, 3.0)
    hello_imgui.image_from_asset("images/world.png", image_size)

    imgui_md.render(
        "**Read the [documentation about assets](https://pthom.github.io/imgui_bundle/quickstart.html#quickstart_about_assets)**"
    )
    show_doc("AssetsDoc")


def demo_markdown(app_state: AppState):
    """A demo about the usage of the markdown renderer"""
    markdown_demo = """
        # Demo markdown usage

        Let's ask GPT4 to give us some fun programming fortunes in markdown format:

        1. **Bug Hunt**: In the world of software, the best debugger was, is, and will always be a _good night's sleep_.

        2. **Pythonic Wisdom**:
            > They say if you can't explain something simply, you don't understand it well enough. Well, here's my Python code for simplicity:
            ```python
            def explain(thing):
                return "It's just a " + thing + ". Nothing fancy!"
            ```
    """
    imgui_md.render_unindented(markdown_demo)

    # Interactive demo
    imgui.separator()
    imgui_md.render("*Try it yourself*")
    imgui.same_line(hello_imgui.em_size(30.0))
    if imgui.small_button("Edit the fortune markdown"):
        app_state.markdown_input = immapp.code_utils.unindent_markdown(markdown_demo)
    _, app_state.markdown_input = imgui.input_text_multiline(
        "##Markdown Input", app_state.markdown_input, hello_imgui.em_to_vec2(40.0, 5.0)
    )
    imgui_md.render_unindented(app_state.markdown_input)
    imgui.separator()

    show_doc("MarkdownDoc")


def demo_plot(app_state: AppState):
    """A demo showcasing the usage of ImPlot"""
    imgui_md.render("# Demo ImPlot")

    data_labels = ["Frogs", "Hogs", "Dogs", "Logs"]

    imgui.text("Edit Pie Chart values")
    imgui.set_next_item_width(250)
    _, app_state.plot_data = imgui.drag_float4(
        "Pie Data", app_state.plot_data, 0.01, 0, 1
    )

    # Prefer to specify sizes using the "em" unit: see https://en.wikipedia.org/wiki/Em_(typography)
    # Below, plot_size is equivalent to the size of 15 lines of text
    plot_size = hello_imgui.em_to_vec2(15.0, 15.0)

    if implot.begin_plot("Pie Chart", plot_size):
        implot.setup_axes(
            "",
            "",
            implot.AxisFlags_.no_decorations,
            implot.AxisFlags_.no_decorations,
        )
        implot.plot_pie_chart(
            data_labels, np.array(app_state.plot_data), 0.5, 0.5, 0.35, "%.2f", 90
        )
        implot.end_plot()

    show_doc("PlotDoc")


def main():
    # This call is specific to the ImGui Bundle interactive manual. In a standard application, you could write:
    #         hello_imgui.set_assets_folder("my_assets")  # (By default, HelloImGui will search inside "assets")
    demo_utils.set_hello_imgui_demo_assets_folder()

    app_state = AppState()  # Initialize our global appState

    # This is our GUI function:
    # it will display the widgets, and it can modify the app_state
    def gui():
        demo_assets(app_state)
        imgui.new_line()
        demo_markdown(app_state)
        imgui.new_line()
        demo_plot(app_state)

    # Then, we start our application:
    #     First, we set some RunnerParams, with simple settings
    runner_params = hello_imgui.SimpleRunnerParams()
    runner_params.window_size = (1000, 1000)
    runner_params.gui_function = gui
    #     We need to activate two addons: ImPlot and Markdown
    addons = immapp.AddOnsParams()
    addons.with_implot = True
    addons.with_markdown = True
    #     And we are ready to go!
    immapp.run(runner_params, addons)


# ///////////////////////////////////////////////////////////////////////////////
# // End of demo code
# ///////////////////////////////////////////////////////////////////////////////


# //
# // Note: the code below only displays the help messages
# //


def get_doc(which_doc: str) -> str:
    """Return the associated documentation string based on the key."""

    docs: Dict[str, str] = {
        "AssetsDoc": """
            The icons and image were shown via this code:

            C++
            ```cpp
            ImGui::Text(ICON_FA_INFO " " ICON_FA_EXCLAMATION_TRIANGLE " " ICON_FA_SAVE);
            ImVec2 imageSize = HelloImGui::EmToVec2(3.f, 3.f);
            HelloImGui::ImageFromAsset("images/world.png", imageSize);
            ```

            Python
            ```python
            imgui.text(icons_fontawesome.ICON_FA_INFO + " " + icons_fontawesome.ICON_FA_EXCLAMATION_TRIANGLE + " " + icons_fontawesome.ICON_FA_SAVE)
            image_size = hello_imgui.em_to_vec2(3.0, 3.0)
            hello_imgui.image_from_asset("images/world.png", image_size)
            ```

            *Note: In this code, imageSize is equivalent to the size of 3 lines of text, using the [em unit](https://en.wikipedia.org/wiki/Em_(typography))*
        """,
        "MarkdownDoc": """
            This markdown string was rendered by calling either:

            C++
            ```cpp
            ImGuiMd::Render(markdown_string);            // render a markdown string
            ImGuiMd::RenderUnindented(markdown_string);  // remove top-most indentation before rendering
            ```

            Python
            ```python
            imgui_md.render(markdown_string);            # render a markdown string
            imgui_md.render_unindented(markdown_string); # remove top-most indentation before rendering
            ```

            This markdown renderer is based on [imgui_md](https://github.com/mekhontsev/imgui_md), by Dmitry Mekhontsev.
            It supports the most common markdown features: emphasis, link, code blocks, etc.
        """,
        "PlotDoc": """
            By using ImPlot, you can display lots of different plots. See [online demo](https://traineq.org/implot_demo/src/implot_demo.html) which demonstrates lots of plot types (LinePlot, ScatterPlot, Histogram, Error Bars, Heatmaps, etc.)

            Note: in order to use ImPlot, you need to "activate" this add-on, like this:

            C++
            ```cpp
            ImmApp::AddOnsParams addons { .withImplot = true };
            ImmApp::Run(runnerParams, addons);
            ```

            Python:
            ```python
            addons = immapp.AddOnsParams(with_implot=True)
            immapp.run(runner_params, addons);
            ```
        """,
    }

    return docs[which_doc]


@immapp.static(is_doc_visible={})  # type: ignore # (ignore redef)
def show_doc(which_doc):  # noqa: F811
    # Access the 'static' variable
    is_doc_visible = show_doc.is_doc_visible

    # Check if the doc visibility entry exists, if not, add it
    if which_doc not in is_doc_visible:
        is_doc_visible[which_doc] = False

    imgui.push_id(which_doc)
    _, is_doc_visible[which_doc] = imgui.checkbox(
        "More info", is_doc_visible[which_doc]
    )

    if is_doc_visible[which_doc]:
        # The following are assumed to be valid calls within the context of your specific ImGui wrapper.
        # 'imgui_md' and 'get_doc' should correspond to your actual usage and imports.
        imgui_md.render_unindented(get_doc(which_doc))
        imgui.dummy(
            hello_imgui.em_to_vec2(1.0, 6.0)
        )  # Assumes 'hello_imgui' is available in your environment
        imgui.separator()

    imgui.pop_id()


if __name__ == "__main__":
    main()
App icon and app settings (C++ only)
The assets folder is deployed automatically during the build; so that they are available automatically whatever the platform.
App icon
The app icon is defined by the file icon.png in the assets/app_settings folder. It should be square and at least 256x256 (but 512x512 is preferred).
icon.png will define the application icon as well as the window icon. It will be converted to the right format for each platform by CMake (via imgui_bundle_add_app).
See this demo for an example showing how to package a python application.
App settings
macOS and iOS
The app settings are defined by the file Info.plist in the assets/app_settings/apple folder.
You can copy and edit this example by adding your own settings (replace ${HELLO_IMGUI_BUNDLE_XXX} by your own values).
You can also specify different settings for macOS and iOS via Info.macos.plist and Info.ios.plist